Thursday, September 12, 2013
Gluten-Free Chocolate Chip Cookies
I've been baking chocolate chip cookies since I was a kid. I wrote all about it in this post. Then my son was diagnosed with celiac disease last November and was prescribed a gluten-free diet. At first, I was enthusiastic about trying new flours and I was sure that I'd come up with some fantastic baked goods that were gluten-free AND delicious. Well, after a few failures with the packaged "all-purpose gluten-free flour" baking mixes, I decided it was time to start experimenting with creating my own flour mix.
I used my own blend for the first time in my banana bread recipe. (I find that baked goods that already have a bit of a texture to them are easier to switch to gluten-free without anyone noticing.) Then I tried it again in my chocolate chip cookie recipe. I am thrilled to say that these cookies are delicious. They are a bit less chewy than the original recipe (but maybe that means I baked them a tad too long?). I had a couple people try them and they said they wouldn't have been able to tell they were gluten-free unless I told them.
Can't wait to try them? Here's the recipe!
Gluten-Free Chocolate Chip Cookies
Mix together with a whisk in a large bowl and set aside:
1/4 cup almond flour
1 cup white rice flour
1/2 cup sweet rice flour
1/2 cup tapioca flour
1 teaspoon xanthan gum
1 teaspoon baking soda
In the bowl of an electric mixer, combine the following and beat until smooth and creamy:
1 cup softened butter
1/4 cup granulated sugar
3/4 cup firmly packed light brown sugar
1 teaspoon vanilla
1 package (4 serving size) Jello instant vanilla pudding mix
Beat in 2 eggs.
Gradually add the flour mixture. Then stir in a 12-ounce package of chocolate chips.
Drop by rounded teaspoon onto ungreased baking sheets. Bake at 375 for 8-10 minutes.
Makes about 4 dozen.
Saturday, September 7, 2013
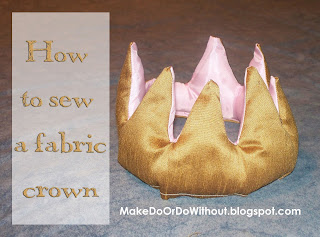
How to Make a Fabric Princess (or Prince) Crown
My niece is going to turn two years old soon and we are planning a pink and gold party. I thought she'd need a pink and gold crown to wear at her party. I had made a couple blue and gold crowns for my sons when they were younger, so I used the same technique here.
The first step is to make a pattern. I had a foam crown from Oriental Trading that fit my boys' heads and I traced it on to tracing paper to make a pattern.
Cut one each of gold and pink fabric. To make sure my crown ended up looking symmetric, I folded my pattern in half and I folded my fabric in half. Then I pinned the pattern to both pieces of fabric at once with the fold of the pattern on the fold of the fabric. Both of my fabrics were thin so cutting through four layers at once wasn't a problem. (I got my fabric from the remnant bin at JoAnn Fabrics because you need less than 1/2 yard of each color.)
Lay both pieces of the fabric crown, right side down, on a hard surface. Fold up the bottom edge of both pieces a 1/4 inch or 1/2 inch and iron it so it stays put.
Pin the right sides together and sew around the whole crown except for the bottom edge. Leave the bottom edge (where you ironed the hem) completely open. After sewing, trim the tips off of the crown points close to your seam. Then turn the crown right side out.
Stuff the crown lightly, using a pencil to push the stuffing up into the points.
Pin bottom sides together. Topstitch along that bottom edge sealing up the crown.
Sew strips of velcro on the ends of the crown to hold the crown closed. (If you want a neater crown you should sew the velcro on the pink and gold pieces of fabric before you sew the crown together.)
And you're done!
I can't wait to see my niece with this crown perched on her blond curls!
Subscribe to:
Posts (Atom)


