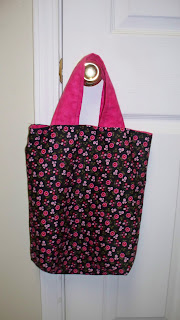
I recently sewed tote bags for my nieces for Christmas. Since I have 2 sons, it was very refreshing to work with the bright pink fabric! I used flannel for the bags and the linings because JoAnn was having a great sale.
Here is the first bag I made:
I tried to take photos of the steps I took as I made the second tote bag, and I'll try to explain the process here. Remember that I am a newbie seamstress myself!
Cut out the fabric: I cut 2 fabrics the same way. The floral one will be the outside of the bag and the pink one will be the lining. In my example the strips of fabric are 14 inches wide and 30 inches long. In the photo, the length is folded in half to form two 14 x 15 inch rectangles.
Sew the sides: The fabric is folded in the picture with the wrong sides together. Flip it around so that the right sides are together. Sew up the sides of the fabric. (The "bottom" is where the fold is, the "top" is open, and you sew up the 2 sides of the bag.)
Make the bag depth: While the bag is still inside out, press open the seam you just made. Then grab one of the bottom corners of the bag and flatten it in a triangle shape. Sew a straight line at the bottom of that triangle. This will give your bag a bottom. How big your triangle is will determine how fat your bag will be. After you've done one corner, do the other one the same way.
Then you snip off the top part of your triangle, above the line you just sewed. Repeat for other triangle.
Once you've finished the above steps and formed the basic bag with your outer fabric and your lining fabric, it's time to make the handles.
Make the handles: I used leftover pink lining fabric for my handles. I cut two rectangles about 14 inches long and 6 inches wide. (I like to make my handles somewhat fat because skinny handles are insanely difficult to turn right side out later.) Fold the fabric, right sides together, in half the long way to form a 14 x 3 inch rectangle.
 |
| This is Carl. He has to be RIGHT by me at all times. |
Attach the handles: Turn your outer bag fabric right side out. Pin the handles to the top open edge of the bag. Position the handles as shown in the photo - the middle seam on the underside of the handle should be facing up.
Sew straight across the handles and attach them to the bag. I usually go over them a couple times to make sure it's a strong seam. At this point, it is very important that you don't sew your bag closed!! Once you do one handle, attach the other one to the other side of the fabric. Try to line them up so they match on both sides of the bag.
Attach lining to bag: Here's where I always get confused, so I'll try to explain this as well as I can. Your outer bag (with handles attached) is right side out. Your lining is inside out. Stuff the outer bag INTO the lining so that the right side of the lining faces the right side of the outer bag. (The handles are tucked inside between the lining and the outer bag.)
Line up the side seams on the outer bag and the lining. Pin, and sew around the top of your bag, leaving about 4 inches open. In mine, I left the spot between one of the handles and one of the side seams open. Again, don't sew your bag closed at this point!
Now, reach in through the hole you left open and turn everything right side out. This takes a bit of tugging. Your creation will look like this:
Stuff the lining part into the outer bag part and now it looks like a tote bag! You just have to topstitch around the top edge again to close that hole you left for turning, and to make everything stay in place. Fold in the raw edges of the hole, and start there, and continue with a straight stitch all around the top of the bag. These stitches will actually show so I go a little slower and attempt to make somewhat of a straight line.
And then your bag is done!


No comments:
Post a Comment